テストファーストな開発手法の一つ。従来の「設計→実装→テスト」に対して、テスト駆動開発は設計後「テスト→実装→リファクタリング」を繰り返していく開発手法です。
Node.js + Express + Jest + Supertestを用います。
以下のようなブログ投稿システムの基本的な機能を作っていきます。
mkdir building-a-node-app-with-tdd
cd building-a-node-app-with-tdd
npm init -y
npm install express
npm install --save-dev jest supertest
プロジェクトを初期化し、expressのインストール、jestとsupertestのインストールを行います。
  "scripts": {
    "test": "jest"
  },
  "jest": {
    "testEnvironment": "node"
},package.jsonに上記を追記します。
mkdir __test__プログラムを書いていく前に、先にテスト書きます。 今回は、4つのエンドポイント想定して書いていきます。
const request = require("supertest");
const app = require("../app");

describe("Blog API Tests", () => {
  it("Should create a new blog post", async() => {
    const res = await request(app)
      .post("/api/posts")
      .send({title: "Test Post", content: "This is a test post."});

    expect(res.statusCode).toEqual(201);
    expect(res.body).toHaveProperty("id");
    expect(res.body.title).toEqual("Test Post");
    expect(res.body.content).toEqual("This is a test post.");
  });

  it("Should get all posts", async() => {
    const res = await request(app).get("/api/posts");

    expect(res.statusCode).toEqual(200);
    expect(res.body.length).toBeGreaterThanOrEqual(1);
  });

  it("Should update an existing blog post", async() => {
    const postRes = await request(app).get("/api/posts");
    const postId = postRes.body[0].id;

    const updatedRes = await request(app)
      .put(`/api/posts/${postId}`)
      .send({title: "Updated Post", content: "This is an updated post."});

    expect(updatedRes.statusCode).toEqual(200);
    expect(updatedRes.body.title).toEqual("Updated Post");
    expect(updatedRes.body.content).toEqual("This is an updated post.");
  });

  it("Should delete an existing blog post", async() => {
    const postRes = await request(app).get("/api/posts");
    const postId = postRes.body[0].id;

    const deletedRes = await request(app).delete(`/api/posts/${postId}`);
    expect(deletedRes.statusCode).toEqual(200);
  });
});const express = require("express");
const app = express();
app.use(express.json());
module.exports = app;Expressサーバーを立てます。 一旦ここまで作成したら、下記コマンドを実行してみましょう。
npm test先ほどpackage.jsonに記載したscriptが実行され、テストが行われます。
コマンド結果の下部が以下のようになっているかと思います。
まだコードを書いていないので、全てfailedしています。
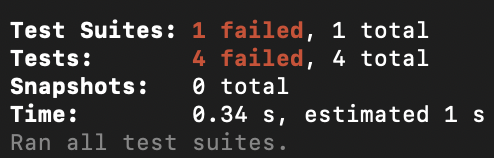
ここからコードを実装していき、このテスト結果を一つずつ、パス(pass)させていくのが、Test-Driven Developmentになります。
const express = require("express");
const app = express();

app.use(express.json());

let posts = [];

// Create a new blog post
app.post("/api/posts", (req, res) => {
  const {title, content} = req.body;
  const id = posts.length + 1;
  const newPost = {id, title, content};
  posts.push(newPost);
  res.status(201).json(newPost);
});


// Get all blog posts
app.get("/api/posts", (req, res) => {
  res.json(posts);
});

// Update an existing blog post
app.put("/api/posts/:id", (req, res) => {
  const id = parseInt(req.params.id);
  const {title, content} = req.body;
  const index = posts.findIndex(post => post.id === id);
  if(index !== -1) {
    posts[index] = { ...posts[index], title, content };
    res.json(posts[index]);
  } else {
    res.status(404).json({error: "Post not found."});
  }
});

// Delete an existing blog post
app.delete("/api/posts/:id", (req, res) => {
  const id = parseInt(req.params.id);
  posts = posts.filter(post => post.id !== id);
  res.json({message: "Post deleted successfully."});
});

module.exports = app;app.jsを上記のように修正します。4つすべての記載していますが、一つずつ実装していき、その都度npm testを実行してもokです。
npm test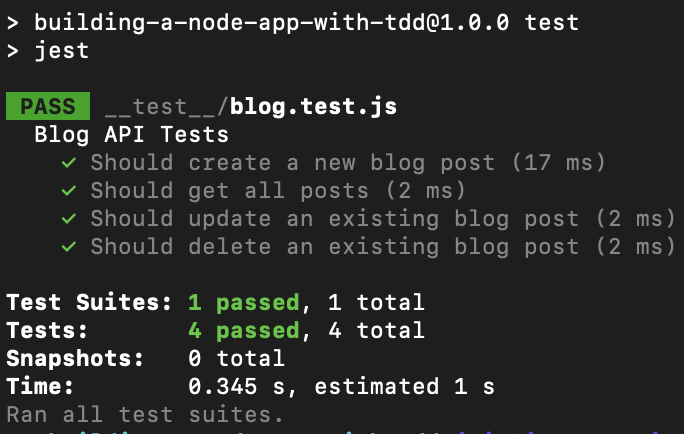
©Omori
MEOW!